Misecu IPC-DM07-20SC IP camera with ZoneMinder

Our home was guarded by 6 analog low quality cameras connected over the coaxial cable to the Chinese DVR. At some point it broke down, apparently because of overheating. I could buy another one for less than $100 but I would be stuck with analog again. On the other hand those hybrid recorders that support both analog and digital are quite expensive and not very powerful.

I was reminded by a colleague that there was a ZoneMinder – open source solution that can replace DVR. My friend donated unused PC and I reused old HDD salvaged from the broken DVR. I only had to buy a PCI card that would be able to capture the picture from analog source. I found one used for about $80. It was Kodicom 8800 clone. It worked out of the box but I never was able to achieve color picture. It wasn’t such big issue because my plan was to replace all analog cameras with IP at some point.

I wanted to start with something that wouldn’t cost me an arm and a leg. Unfortunately it is very hard to find any information about those cheap Chinese cameras that are sold on AliExpress. Sellers only state if they are ONVIF conformant. So I took a shot and bought Misecu IPC-DM07-20SC for less than $30 including PoE power adapter (injector). It supports 1080p resolution which was desired because I wanted to see how much my DVR server can handle.

The camera comes with one page instruction that directs you to their software (included on a CD) that could help you configure the camera. But I was using Linux and that was a problem. When navigating to the camera default IP it gives you Chinese interface and the seller couldn’t help me with that. Apparently if you use anything else than Internet Explorer it defaults to Chinese because JS is broken. I was able to login from IE from my wifes laptop but there were almost no options there to work with. So I installed their software, configured networking and removed annoying overlays with camera name and date. It is best to disable all unnecessary settings because everything will be handled via ONVIF so it would be treated as a dumb picture source.

After configuring it and connecting it with the same subnet as ZoneMinder (this is important!) I was able to click ONVIF in Add new monitor and after some time it gets detected properly. Picture quality is decent albeit not the best I saw from 1080p camera. But hey – it was less than $30 so what did you expect? 🙂

Here are pictures from the night and from the cloudy day. They were taken from ZoneMinder archive so quality might be lower than provided by camera itself. Don’t mind the glare during the night – it comes from the lamp mounted just few inches from the lens.

Day
Night

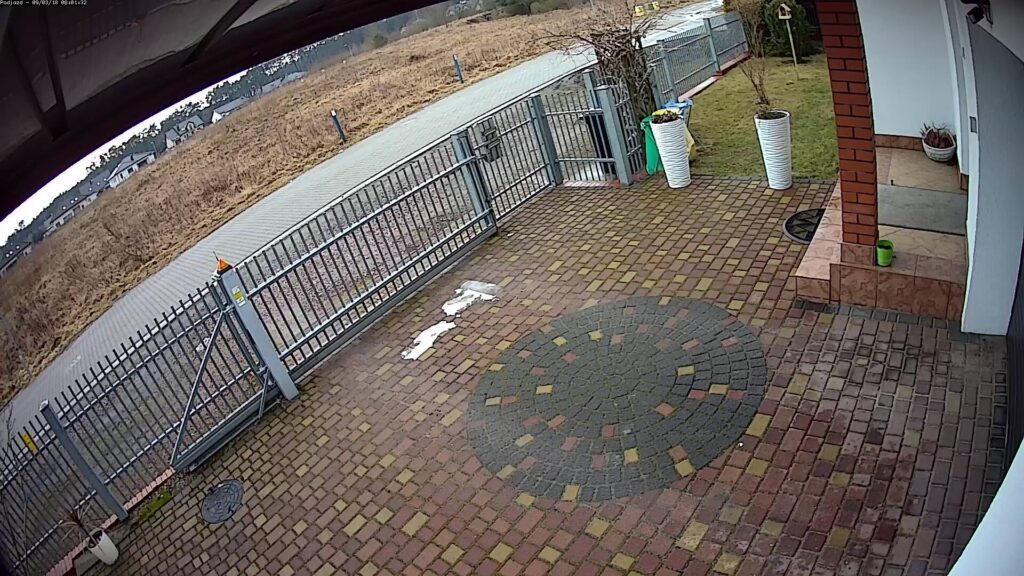
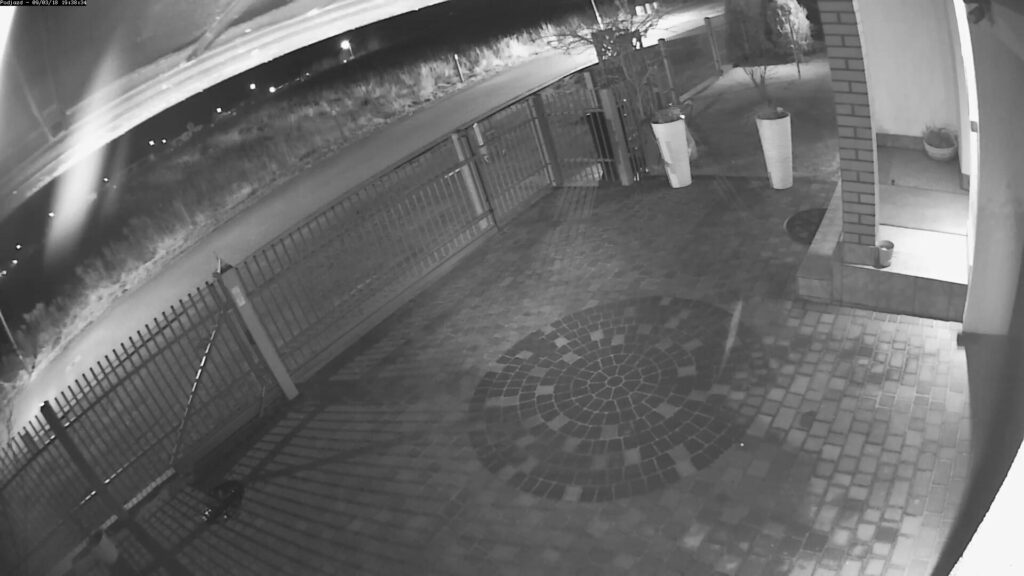
Please note that this camera has module IPG-50HV20PES-S manufactured by Hangzou Xiongmai Technology. I guess there are other manufacturers using this parts so it should also work with different models. I updated ZoneMinder wiki to spread the word. In the future I want to test some other models especially with PTZ function. Stay tuned!

Sonoff TH16 with OpenHab

After an encouraging success with Sonoff Touch I ordered the TH16 model. It is designed to be hidden out of sight (as it is ugly and with tiny button) and it has additional 2.5mm port to connect a sensor. I chose AM2301 model which provides temperature and humidity measurements.

We begin with flashing the device following my guide for Sonoff Touch. After that we need to connect firmly the sensor. Please note that the plug needs to be flush with the casing, because it won’t work otherwise (it needs to loudly click when connected). I lost some time before figuring it out.

Then go to the webpage of you Sonoff, click Configuration, then Configure Module. While there change Module type to 04 Sonoff TH and GPIO 14 Sensor to 02 AM2301. After clicking Save it will reboot and you will be able to see temperature and humidity on main page of the Sonoff. If it doesn’t show up you need to check your cabling.

Having that working properly we need to go to Configure MQTT under Configuration. For my setup I chose a meaningful name like sonoff-road and sonoff/%prefix%/%topic%/ as Full Topic. Clicking Save will reboot the device again and you should be getting MQTT messages published to your broker. But this time they are quite different than those sent on simple power change. The topic is tele instead of stat and it sends JSON formatted data, like in following example caught with mosquitto_sub -d -t "#":

{"Time":"2018-02-24T22:11:10", "AM2301":{"Temperature":20.8, "Humidity":41.1}, "TempUnit":"C"}

It is published with the topic sonoff/tele/sonoff-road/SENSOR.

To use this data correctly we need to install JSONPath transform from the PaperUI of the OpenHab. Navigate to Add-ons and from Transformations tab click Install besides JSONPath item. Now we are ready to use it in .item file as follows:

Number ExternalHumidity "hum [%.1f]"
{mqtt="<[mymqtt:sonoff/tele/sonoff-road/SENSOR:state:JSONPATH($.AM2301.Humidity)]" }

For sake of completeness here is a item for handling power state:

Switch LightRoad "Road Lights" (gLightsCeiling) [ "Lighting" ]
{mqtt=" >[mymqtt:sonoff/cmnd/sonoff-road/power:command:*:default],
<[mymqtt:sonoff/stat/sonoff-road/POWER:state:default]" }

Flashing knockoff Arduino Mega 2560

I usually use AliExpress as my first choice for DIY parts and I bought there Arduino Mega 2560 clone. My plan was to use it with the RFlink software to receive 433 MHz signals (and who knows – maybe send them). It was mostly for temperature and humidity sensors which readings then would be fed to OpenHab. Unfortunately I missed the information that this particular clone was equipped with CH341 serial to USB chip instead of the usual Atmega 16u2. And that was bad news because it is known for its issues with drivers and quality in general. For me it was disconnecting the serial port all the time and when I tried flashing it I was got following error message:

avrdude: stk500v2_ReceiveMessage(): timeout
avrdude: safemode: Verify error - unable to read hfuse properly. Programmer may not be reliable.
avrdude: safemode: To protect your AVR the programming will be aborted
avrdude: stk500v2_ReceiveMessage(): timeout

It was still misbehaving even if I changed USB ports or boooted into Windows. Thankfuly I had USB TTL serial converter based on PL2303 lying around. So I hooked it up this way (I created Fritzing diagram but a table seems to be much more readable):

USB TTLArduino Mega 2560
+5VVin
GNDGND
RXDTX0 (D1)
TXDRX0 (D0)
3V3Not Connected
USB TTL to Arduino Mega 2560 connection

Now I had stable serial connection and tried flashing again and it worked flawlessly. Here is how to do it using Ubuntu 17.10 environment which has avrdude in official repositories. Start by installing it:

apt-get install avrdude

Then download the latest RFlink software, unpack it somewhere and change to the directory containing RFLink.cpp.hex file. After that you can flash your device (please note that you might need to change /dev/ttyUSB0 to something used on your system, you can use dmesg to find out):

avrdude -v -p atmega2560 -c stk500 -P /dev/ttyUSB0 -b 115200 -D -U flash:w:RFLink.cpp.hex:i -F

Because we are using TX/RX lines directly there is nothing that could reset the Arduino to put into the flashing mode when required. You need to do it manually at some point after starting the process. I usually push the reset button after avrdude prints the message Overriding Baud Rate but YMMV.

Please note that I added -F switch at the end of avrdude command. It was because my Mega came with incorrect Device Signature set to some random hex (0x303030 if I remember correctly). Using -F forces it to flash it anyway and after that device should have the proper ID – 0x1e9801. On the next flashing the -F should be no longer necessary.

And next time – do buy Atmega 16u2 based Arduino Mega 2560. It is just two bucks more. It can be recognized by additional set of ICSP pins in the top left corner (near the USB port). It is clearly visible on a picture in Official Arduino Store. If in doubt always ask the seller.

Flashing Sonoff Over The WiFi

This is a quick guide to installing the alternative firmware on the Sonoff Touch using only the WiFi. No soldering is required, just a laptop with a wireless adapter. I wanted to reflash this device for two reasons – to connect it to the OpenHAB via MQTT and to get rid of Itead closed source cloud enabled software. All steps below were carried out on a Ubuntu 17.10 although I am pretty sure they should also be working fine on a Ubuntu 16.04.

Preparing the tools

$ sudo apt install python3-pip python3-dev 

After that you need to get the latest PIP which is not bundled with Ubuntu. You could do it either via the virtualenv or just on your account. I went with the second option

$ python3 -m pip install --upgrade pip 

After that you can clone the SonOTA repository

$ git clone https://github.com/mirko/SonOTA.git 

Before you start flashing you need to make sure that you don’t have any firewall rules on INPUT that could cause trouble. If using ufw you need to check if it is off

$ sudo ufw status
Status: inactive

Flashing

When the environment is set up you can go into SonOTA directory and start the process:

$ cd SonOTA ; ./sonota.py

It will ask you about the IP address you wanted to use. Make sure it is the one on the interface connected to the same WiFi that Sonoff will be using. Also type in SSID name and the password. It would look like this (please bear in mind your IP will be different)

Current IPs: ['192.168.77.19']
Select IP address of the WiFi interface:
0: 192.168.77.19
Select IP address [0]:
WiFi SSID: YourWifiSSID
WiFi Password: YourWifiPassword

Using the following configuration:
Server IP Address: 192.168.77.19
WiFi SSID: YourWifiSSID
WiFi Password:
Platform: linux
** Now connect via WiFi to your Sonoff device.
** Please change into the ITEAD WiFi network (ITEAD-100001XXXX). The default password is 12345678.
To reset the Sonoff to defaults, press the button for 7 seconds and the light will start flashing rapidly.
** This application should be kept running and will wait until connected to the Sonoff...

At this point you need to look for a WiFi network name starting with ITEAD- and followed by some numbers. Unfortunately this wasn’t the case for me. That network wasn’t showing up at all. So I had to reset the whole device by touching the button on the Sonoff and waiting for about 7 seconds (until it started to flash its LED rapidly). After that the network showed up and I was able to connect to it with a password 12345678.

Being connected to that network you will see some more diagnostic messages until it shows the notice about “FinalStage” network, looking like this

*** IMPORTANT! *** ** AFTER the first download is COMPLETE, with in a minute or so you should connect to the new SSID "FinalStage" to finish the process. ** ONLY disconnect when the new "FinalStage" SSID is visible as an available WiFi network.

At this point you need to look for a network with a SSID “FinalStage” and connect to it. After a while it will continue with diagnostic messages (I edited them for brevity)

This server should automatically be allocated the IP address: 192.168.4.2.
If you have successfully connected to "FinalStage" and this is not the IP Address you were allocated, please ensure no other device has connected, and reboot your Sonoff.
............................Current IPs: []
.Sending file: /ota/image_arduino.bin
.Current IPs: ['192.168.4.2']
The "FinalStage" SSID will disappear when the device has been fully flashed and image_arduino.bin has been installed.
If there is no "Sending file: /ota/image_arduino.bin" log entry, ensure all firewalls have been COMPLETELY disabled on your system.
......200 GET /ota/image_arduino.bin (192.168.4.1) 17943.19ms

After a while the “FinalStage” network will disconnect you and dissappear. It means it has flashed completly and you need to look for a WiFi name starting with sonoff- followed by 4 digits. After connecting to it you need to point your browser at http://192.168.4.1/ and finish the setup. This step is required because the Sonoff won’t remember the settings you provided at the beggining of the whole process.

DHT11 vs DHT22

I am in a slow process of setting up home automation. It was Domoticz at first but my colleague talked me into OpenHab and I never looked back. But this is about something else.

I am using NodeMCU with ESP Easy software and sending sensors readings using MQTT protocol to the Mosquitto broker. Results were quite good altough readings seemed very innacurate and rounded to the nearest integer. So you had either 19°C or 20°C but not the decimal part. It shouldn’t be any suprise to me because when I announced that I am playing with DHT11 I was immediately told to ditch it for DHT22.

So I ordered DHT22 (AM2303 in fact) and set up them both on the same NodeMCU and used InfluxDB to store the data and then graph it with Grafana. The orange line is DHT11 and the green one is DHT22.

Comparison: DHT11 vs DHT22

The difference is amazing. Humidity reading is about 10% – 15% higher on DHT22 than on DHT11. The temperature difference is a little more, but it comes from the integer only reading. In worst case it is almost 2°C. Also as you can see it is much smoother because it gives you decimal readings. The DHT11 is less than a dollar per one and DHT22 is about $2.50. The choice for me is quite clear.

Please nothe that I don’t have a good reference thermometer so I didn’t include absolute comparision. It was rather one sensor vs another. But for sake of completness I used standard home digital thermometer. It was showing 19.8°C while DHT11 had 19°C and DHT22 had 19.4°C.